


Page last Modified:
Wednesday, February 15, 2006 12:41:35 PM - Views

The odometer on this car has been broken since late
July 1998, previous mechanics told my wife
she needed a new one, and well at 148.00$ for the part alone, she
always has put it off.
Now that the car is mine, I started browsing all
over the net stumbled over information
about odometer repairs and this "project" covers disassembly of
Instrument Cluster.
So here is it explained, in details and pictures. Hoping that this tech note can
provide
to anyone out there, thinking about it, and easy step by step pictographically
Tech note.
Enjoy, I know I am. :)
Keep in mind that fiddling with the odometer is illegal in some states (check your local laws)
| Remove the 2 screws holding the plastic cover of your instrument cluster trim | |
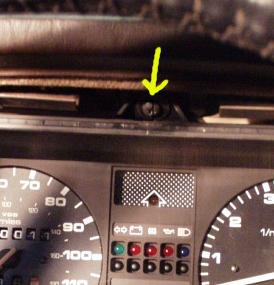 |
Unscrew the dash mounting screw (location shown on picture) |
 |
Remove the under dash leg protector board, my particular car does now have the under the dash tray anymore so I have not put that into this tech note, sorry, check service manual for that. The picture indicates the location of the three (3) plastic pop-out plugs, then simply pull it out forward. |
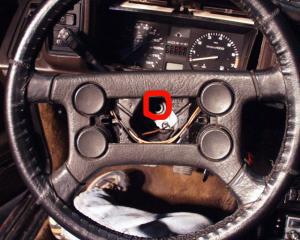 |
Pop the center piece of the steering wheel with a flat screwdriver and using a 24 mm socket, unscrew the center bolt on the middle of the steering wheel ( shown in circle in the picture) |
| Unplug the Speedometer cable (pinch and gently pull the plug to remove it), the power connection next to it, as well as the 2 large connectors at the base of the instrument panel. (one on each base corner of the box), simply pull instrument cluster out you might find that the plastic (covered with a soft rubber) pivot points at the base of the instrument cluster make is a little hard to remove it, think diagonals (grin) and take your time. it will come out. | |
 |
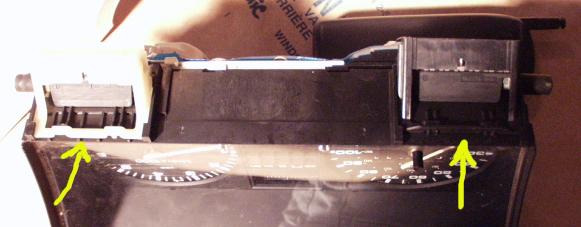
flip the instrument cluster over on a large flat area, the picture shows; arrows indicating the location of the 3 bulbs that need to be removed, and replaced if required (as I did) also indicated are the 8 screws that need to be removed, once that is done, gently lift the PCB plastic from pins and pegs (located near top of cluster bulbs holes. |
 |
Flipping the Cluster on it side, dials facing you, gently pop out the connector plugs from their sockets |
 |
This is a close up of one of the connectors and how it should simply slide out of position to release itself from the cluster box |
 |
There! the dial cluster out from the instrument cluster box. Now the fun begins! |
 |
flipping the dial cluster back around, find the pin which to slip out the PCB plastic out of, and the screw to remove |
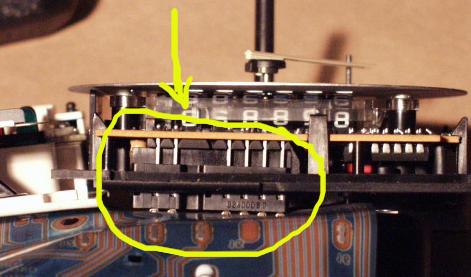 |
Gently separate the edge connector from the PCB plastic from the speedometer dial |
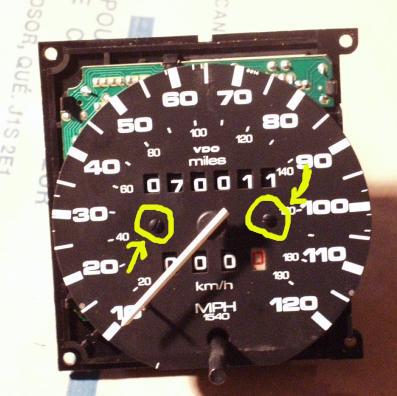 |
The dial is released!, Gently grab between your thumb and forefinger
the bade of the needle and pull into your hand (only using finger strength)
until the needle pop's off. and remove the 2 screws to remove face of the
dial. [My needle was a bit harder to get off - I ended up using a plastic fork to pry them out - BE CAREFUL] |
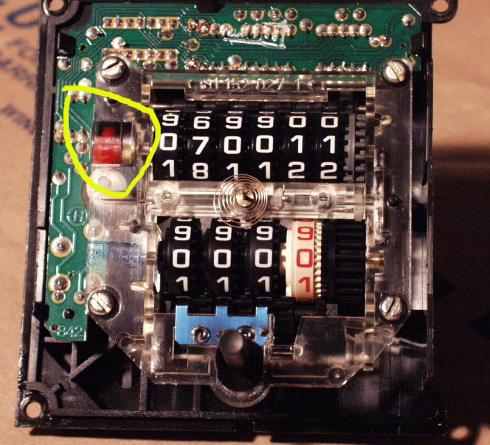 |
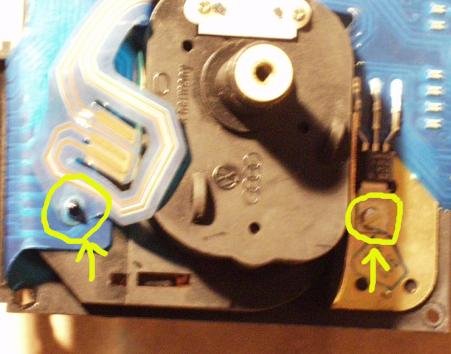
The red gear (circled in picture) is usually the gear at fault for a stopped odometer. realign and use some white lithium grease to lubricate. |
| Reverse instruction to reassemble the instrument cluster. |
[Back to Top] [Index] [VWC Forums] [Contact/Donate]
Remember, If you need help with any of these technotes -Contact Me!
We are not responsible for damages caused while following the directions in these pages. These pages are for informational use only.
This site is in no way affiliated with or endorsed by Volkswagen of America or VW AG. Volkswagen and the VW logo are registered trademarks of Volkswagen
AG. To visit the official Volkswagen sites go to Volkswagen Germany
or VW of America.
All original images and content Copyright © 2001-2005 Eric Soltwedel, Tim McConnell and vintagewatercooleds.com, all rights reserved.
Not all of the pages comply with the new standards yet. I have the links here for debugging purposes.
![]()
![]()
![]()
About the Standards and Scripts