Page last Modified: Friday, March 31, 2006 - Views
VintageWatercooleds.com Technotes ::
Brakes and Suspension :: 8.9" Rear Disc
Brake Conversion
ALL Sciroccos are A1s (Mk2s are still A1 as well) - And this will also apply to any Rabbits, Cabriolets
and 80-84 Jettas. The first car being shown is a Mk2 1985 Scirocco, the second
is a 1980 Mk1 Scirocco.
A2 conversion is similar.
New! March 31, 2006, Added the alternate version below, Fixed
a lot of old crappy code in the table on this page.
By far, the easiest way to to this is to
find a 16v Scirocco in the Junkyard. Get the whole back axle. Maybe Buy the
parts off of eBay or Scirocco classifieds. The 16v Scirocco has 8.9" Disc brakes
in the back. Keep in mind that they weigh about 5 more pounds per side, and
that's un-sprung weight too.
A new Master cylinder is necessary, because these disc brakes
move more hydraulic fluid. You can get the larger Master
Cylinder from a car with a 22mm master cylinder. The Scirocco
16v and the Corrado G60 had these.
The Proportioning valves are VERY important. If you don't put
them in, your rear wheels will lock and cause your car to fishtail everywhere
and it is very dangerous.
Go buy new discs and new pads. You may as well put new rear
wheel bearings there too while you're at it.
Useful Part Numbers:
Scirocco 16v Rear Discs: 357 615 601
Scirocco 16v Rear Caliper (left): 191 615 423 AX
Scirocco 16v Rear Caliper (right): 191 615 424 AX
Scirocco 16v Proportioning Valves: b 533 612 151 A
*Jetta GLI and GTI with Rear discs have the same part numbers for these*
 |
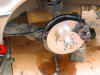
Using the center of the beam, jack your car up, place safe jack stands under
each side of the axle, Remove the wheels from the car, then gently pop the
grease cap from the center of the axle, remove the cotter pin, slip the
nutlock off, remove the hex nut, and the washer. Next grab the drum, and
gently pull on it until the front bearing slips off. Remove the rear drum.
if your seal stayed with your drum you should only have the innards of the
drum brake system showing.
|
 |
Now disconnect the brake line from the rear drum assembly.
|
 |
Remove the four (4) bolts holding the rear drum assembly hub to the rear
axle.
|
 |
clean the plate of the rear axle up (using a wire brush to remove top layer
rust)
You can paint it with some rust paint. |
 |
This picture shows the reason why we need to replace the rear drum hub
(left) with a disc brake hub (right) the additional 2 holes in the frame
of the hub is to hold the carrier unto the assembly.
|
 |
Lay the rear drum assembly down, pull on the Emergency brake cable, slip a
tool to hold the plate in place and slip the end off the bracket. set the
rear assembly aside,
next we need to disconnect the emergency brake cables. |
 |
pop the cover off your emergency brake lever inside the car (much easier if
you remove the passenger side seat from the car.) Slip a wrench on the
bottom nut.
|
 |
Hold the bottom nut still, and loosen the top nut, then remove the bottom
one. (you might need to use a pair of pliers to hold the cable in
place while you loosen the last nut). get under the car and gently pull
the cable out from under the car.
|
 |
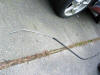
The only major issue in doing this conversion was to change the current
break line (hard line) from atop the axle to below the axle, So this picture
shows the location of the first rubber line that needs to be disconnected
(which I replaced with the dual female ended stainless line later, and then
straightened out the line (be careful not to fold it...)
|
 |
This picture shows the routing of the Stainless Steel brake line on the
axle beam. |
 |
Use fuel line rubber hosing, split in two to provide additional
anti-friction for the hard line against the rear axle. |
 |
Tie wrap so the lines don't move. |
 |
re-close the clamp on the upper end of the axle to hold the line in place.
Next assemble the back plate over the axle hub and bolt the hub onto the
axle. (the bolt pattern prevents mounting this backwards, as long as you
remember that the hole in the plate should be facing towards the rear of the
car), then install the rear bearing dust shield.
|
 |
Attach the other brake line to the calipers.
|
 |
put the carrier into the vise, and gently pop the sliding part off the
rubber boot, clean and re-grease the shaft and put a dab of grease into the
boot, work the shaft in and out a few time until all the air is out of the
passage way of the shaft, and slip the boot back on. repeat for other side
|
 |
There are many ways to slip racer on a disc, you can use a Starter bolt,
and gently tap around the racer to slip it in.
|
 |
this picture is to show you how far you have to go, if you notice there is
still a space below the racer and the final edge where it should sit.
continue to slip it in until it sit completely on this inner edge.
|
 |
then proceed to insert the rear race into the rear of the rotor, again the
race is to be pushed in all the way until it seats on the inner edge.
|
 |
Grease pack the inside of the rotor, then pack your bearings with grease |
 |
put the rear bearing in place, and then gently tap the rear seal into
place.
|
 |
grab your rotor, slip onto the hub axle, push the front bearing in place,
slip the washer in, and screw the nut in, now I like to move the rotor left
and right as I gently tighten the nut unto the axle until the rotor sits all
the way in place, the nut SHOULD NOT be tightened too much. once this is
done, slip the nutlock in place and put in a new cotter pin . All there is
left is to put a dab of grease into the cap and push it back into the hub.
|
 |
Slip the carrier onto the disc and tighten the Hex nuts at the rear of the
assembly.
|
 |
put the pads in place on the carrier, grab your caliper and bolt in place
on the carrier.
|
 |
The Emergency brake cables run along the top side of the axle and slips
through the mounting hole, slip the slip on at this location on the
cable, push the rubber end a bit.
|
 |
Push on the spring and slip the ball end into it's final resting place.
|
 |
Just re-attach your stainless line to the hard line under the axle.
Re-attach the other end to the parking brake lever inside the car.
|
 |
Get all of the air bubbles out of the brake system by bleeding it out. Use
new fluid.
Here is the final product once you are done one side.. repeat all operations
for other side of the car!An important step with
rear brake bleeding is to "gravity bleed" the rear calipers. With the brake
line attached, the rear caliper should be removed from the carrier and
suspended in such a way that the bleeder nipple points skyward so that it is
the highest point of the caliper, then loosen the nipple and allow the air
to escape and let the brake fluid fill the piston.
Initial brake bleeding with the caliper installed can leave an air bubble in
the piston as the bleeder is not at the highest point. After the initial
gravity bleed, future bleedings can be done as standard unless the rear
brake line is removed from the caliper. |
|
The manual states, press the brakes 40 times after bleeding system to reset
the parking brake lines. I have found that the parking brake is still "soft", I
was advised by others that this is NORMAL? and can take up to two weeks for it
to catch completely tight. remember to park in first gear in the meantime! |
NEW - Mk1Scirocco1980 of the VWVortex Scirocco forum. Did this to his Mk1 Scirocco. here's the version technote from him!
Jack your car up, and secure it on jack stands. Take the wheels off, and
start workin!
Take off the grease cap, and remove the cotter pin in the nut
there.
Parts order
Pull the drum off. This can be interesting sometimes. If you have
a problem, just yank it off with some big evil tool - you aren't
keeping the drum brakes, after all! The photo shows the order of the
disassembled parts.
Wheel Cylinder
This next picture shows the back of the wheel drum (wheel
cylinder):
Unscrew it with an 11mm wrench. Be sure to have something to catch
the fluid. It gets all over if you don't!
Parking Brake cable
Inside the car... you must unscrew and pull out the old parking
brake cable. There are two nuts on each one. You must replace them with ones
from a 16V Scirocco! the Old type of cables will not work.
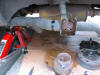
Axle Beam
next, go inside the drum again, and remove the 4 15mm bolts. This
will allow everything to come off of the axle beam. The picture to
the left shows the face of the axle beam.
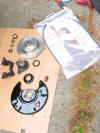
Parts
This next photo shows all the new parts being laid out.
You can also see the Scirocco 16v parking brake cables in the bag.
Rear Bearing
Lightly tap in the wheel bearings with a hammer. you do NOT want
to gouge them for OBVIOUS reasons, pack the brake disc with bearing
grease...be sure to put on a NEW seal.
Bolt the new spindle into the same location as the old spindle
with the dust shield (the big old black thing) in front of it. Then
slide on the brake disc. BEFORE doing anything else, make sure you
bolt the carrier down to the spindle with the brake disc in the
carrier. Then you can put the outer bearing on, washer, nut, nut
locker, and cotter pin. The four bolts get 50ft/lbs of torque, the
two carrier bolts get 25 ft/lbs of torque, and the 24mm spindle nut
only gets FINGER tight.
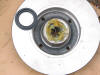
Completed project
Reroute the brake line and e-brake cable. Secure them both to the
axle beam. Put a rubber spacer between the brake line and the axle
beam to prolong life.... (which I did later; not in this picture)
Comment on this technote on the VWC forums
[Back to Top]
[Index]
[VWC Forums]
[Contact/Donate]


