


Page last Modified:
Saturday, March 18, 2006 06:53:38 PM - Views

[16v Alternator : converting to 90A] [Ditching your A/C] [Nifty Alternate Adjustment]
Introduction - How the charging system works
Do you ever start your car, and have to blip your throttle to get your alternator going? If the lights on your dash stay on until you rev it, your blue field wire might be disconnected. Most alternators will 'self excite' when you rev the engine a bit - wouldn't it be nice if you didn't have to do that?
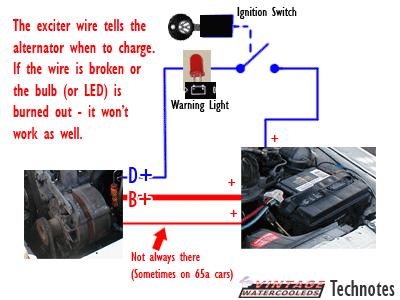
The blue wire is what 'tells' the alternator to charge. It works by putting +12v on the alternator's field coil. If this wire is broken, the alternator will still work, but you will have to rev to get it going. In older VWs, the warning light is a regular light bulb (instead of the LED in newer cars) - so I burns our easier. To fix the wire, just follow it from the alternator to where it goes into the harness near the battery. If it's broken - replace the wire. Sometimes the gauge cluster has broken traces on it - which will have the same effect as a broken wire.
This is pretty easy. Go to the junkyard or the parts store and get the alternator off of a golf 88-92 or something, with A/C and you'll get a 90A alternator. If your car is older, you will have the old 3 pin style connector. Either grab the alternator harness out of the junkyard - or make your own. It's just 1 big red wire to the battery, and one small blue wire to the instrument cluster.
If you have no A/C
This is plug and play. All you have to do is rewire the alternator connections (See Below). The pulleys are compatible.
If you have A/C but you want to get rid of it
Then look at the section below
This is how to go from a 65A to a 90A without removing your A/C.
Thanks to Neptuno for these directions!
Say you have a tired 65A Motorola or Bosch alternator. It is starting
to make bearing sounds and not charge properly and you want to have more
juice for the future stereo and fog lights while maintaining juice in
the battery. This is what I did (with the help of some friends)
But here is the catch. You also want to keep the current set up with the
alternator on the bottom and the AC on top. Some of us want to keep the
AC
BEFORE YOU DO ANYTHING TAKE THE NEGATIVE CABLE OFF THE BATTERY (-),
Black one SAFETY FIRST!!!
- Undo the bolts to the alternator tensioner
- Find the Pivot hex Bolt that screws into the engine fixed point from the drivers side towards the passenger side unlike anything else that I have seen.
- Loosen the AC condenser it is going to be on the way ad you will have to push back on it (some fins will be bent!
- Loosen the AC bracket and put it aside.
- Take your time and wiggle the thing out of there!! It will not fit from the bottom of the car and if you are not intending to take the AC out like myself then It will take some pressing back on the condenser, but you can do it!!
- Compare the two alternators. At first glance they seem the same, but trust me they are not. The 90A its a little chubbier and will be harder to maneuver into place than when you took the 65A out! (more condenser fins) The Pulleys are different and with that comes the questioning. They can not be exchanged from the 65A Motorola to the 90A Bosch. The shafts are different too making the exchange of pulleys a no-no.
- The Bosch alternator without modification will be about 1/4 of an inch off for alignment with the rest of the pulleys under the hood. Get some shims you will need 2 large enough to clear the circumference of the shaft. Take the pulley off the 90A alternator and place aside. You will need an impact wrench or a lot of strength to take that pulley nut off while not having it spin around so secure the pulley and go at the nut till you get it loose.
- The pulley wont slide of readily As there is a security key in place to prevent that from happening. You will have to bang on the shat with a punch and hammer while some one catches the alternator underneath. once the pulley is off make sure you know where that little security key is. Take it off with the pulley, washer, and alternator fan and place it aside.
- Place to large shims on the shaft.

|
replace the alternator fan, now grab the key (WOODRUFF KEY) and file one of its end to were it clears the two shims |
 |
|
Now you can place the original shim in place followed by the pulley and the nut *NOTE* you will need LOCTITE |
 |
Place it around the
shaft and nut threads and use that brute force to lock it down with the
impact wrench or torque it down with all your might.
10) Now it is time to place it back on the car, Since the 90A is a bit
larger it will seem that it will not fit into the space that you took
the 65a out off, But it does and that will cost some more bent fins from
the condenser, but just work it in there with the alternator pivot point
facing the place were it will end up!!
11) Align the case of the alternator back onto the engine mounting area
and replace the hex bolt that holds the alternator to the engine. get
your NEW belt back in place.
65A-90A Electrical swap
once everything is in
place you will notice that the terminals are different for the wire hook
ups.
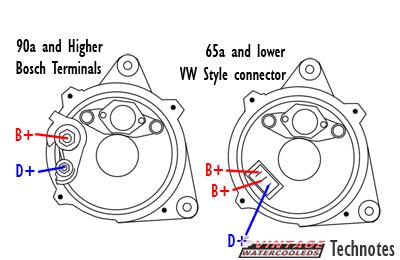
the 65A had a plug in terminal (one blue wire and 2 red wires)
The 90A has a large nut with a D+ on it (where your 2 red wires will go)
and 1 spade terminal B+(or small nut also marked B+) were the blue
exciter wire goes.
You will have to cut
the plug off and then replace the ends of it with new round terminal
fittings to make it work. The two red wires get a round terminal each
and get placed on the D+ and the blue will get either a female push
connector or a small round connector and placed on the appropriate B+
marked terminal.
Replace all the brackets, bolts and nuts an your done. If you decide to
keep that AC it will take a while so be patient and take it at stride,
it is not a cake walk, but it can be done!!
Hope this helps others and it is place in as many DIY VW sites as
possible.
 |
 |
 |
 |
| Motorolla Plugs | Bosch Alternator | A/C Alternator Layout | Upper non-A/C Brackets |
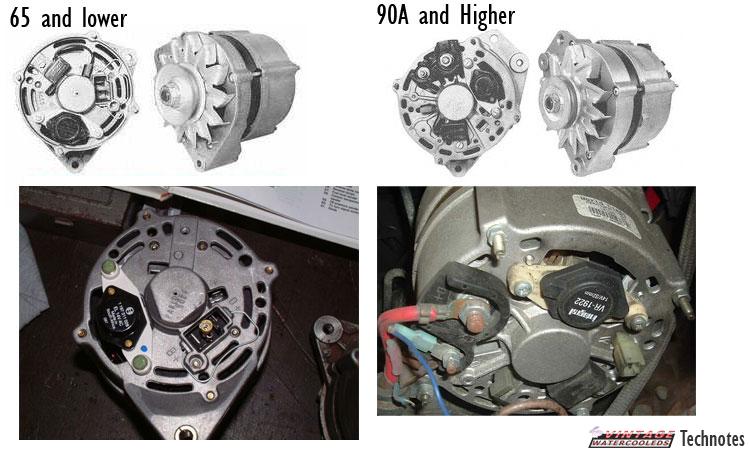 |
| Differences between the 65A plug and the 90A plug |
![]() 16v Engine : Converting to a 90A Alternator
16v Engine : Converting to a 90A Alternator
Joel, a local 16v Owner had this 65Amps alternator in his Rocco, and
well it was shot and since I had done mine prior to starting the web
site.
Joel asked me to change it over for him, I took the time to
perform the transplant of a 90Amps into his.
I decided (since it is basically the same thing 8v or 16v) to write up a
tech note on changing the alternator on a rocco. Simple work 9 bolts, 30
minutes. done...
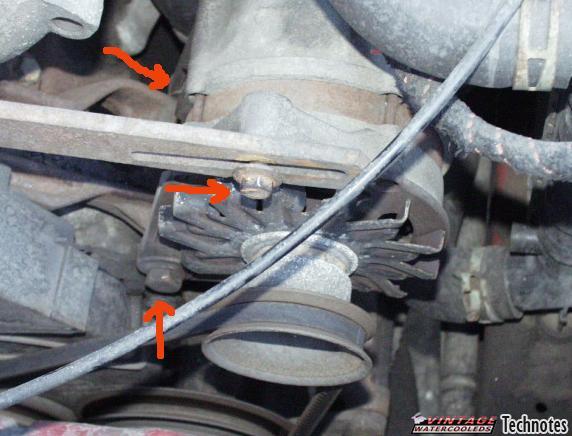 |
Disconnected the negative from the battery then the
positive from the battery, this makes sure you don't get that "Zap"
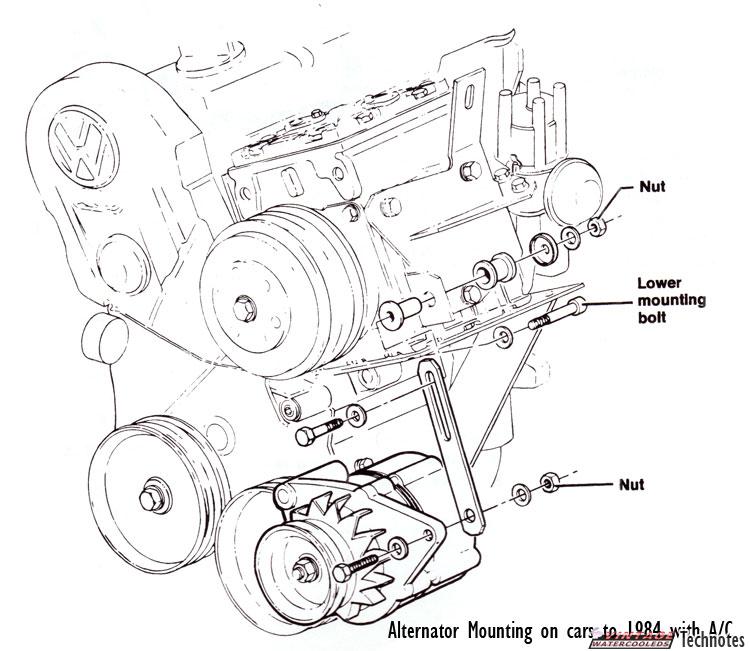
feeling Now located the alternator on the left side of the engine compartment, The arrows indicates the 3 bolts that are to be removed to get the alternator to leave the car. |
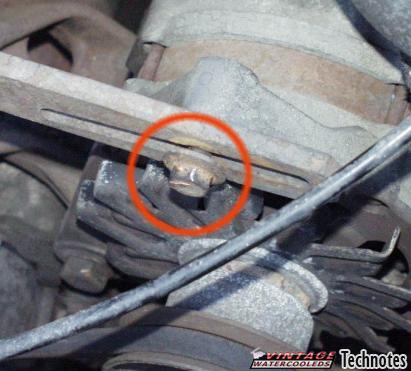 |
Loosen this bolt first, I usually leave it on until I have loosen all the other bolts making the unbolting simple at the end (finger powered.) |
 |
This is the second bolt to loosen, this one you can remove, as the top one still provides enough holding powered for the last bolt to come out straight |
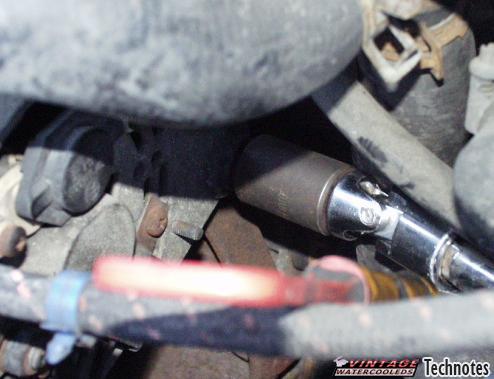 |
On the 16v I had to use a 17mm short socket with a universal joint and a 12" bar to the wrench to get enough straight line to be ale to unbolt it, as the water hose is right in the way of things |
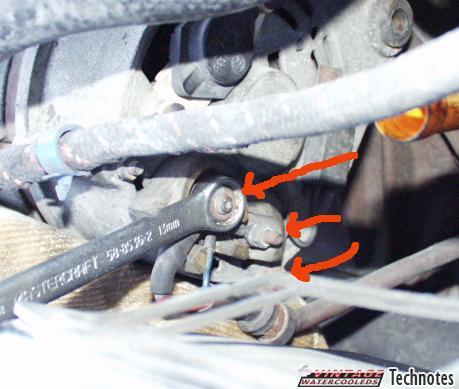 |
Now that the bottom bolts are off, before you go yanking the alternator out, there are 3 more bolts to remove, 1-11mm 2-8mm (shown in the picture with arrows) once you have done this, unscrew the last bolt and take that puppy out. |
 |
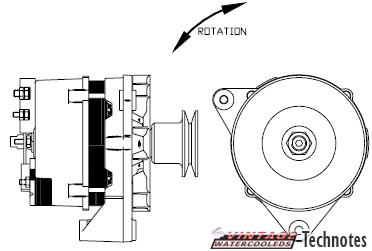
This picture shows the face of the alternators, you need to unbolt this 24mm bolt and transplant the pulley wheel and fan shroud unto the new one, as I was re-building my garage and had no possible use or manually removing this, I visited a nearby garage that made short work of this with an air wrench. |
 |
Here we see the 90 amps alternator being put back on, basically the reverse from above pictures pop the bottom in, loop the belt on, tighten partially top bolt, screw bottom bolts, tighten the belt with the top screw and screw the last 3 bolts at the rear of the alternator back on, put the power cables back on the battery and your are done, turn the engine on...If you have a volt meter gauge it should read between 13-14 volts. |
If you just wanna stop using your multibelt setup with the A/C, flip your waterpump pulley. Use one belt. That's it.
To loose the 65 pounds while getting rid of your A/C requires some
brackets. ---
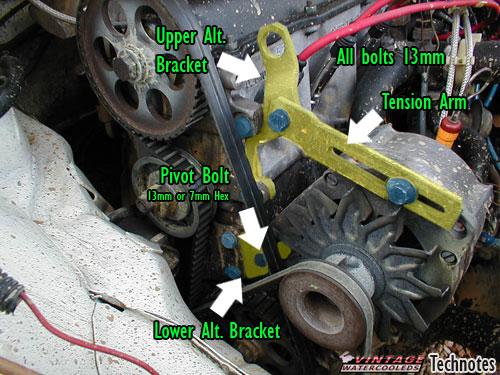
How Non-A/C Brackets look on an 8v Engine.
Go the Junkyard - Find a fox or a Non-A/C Cabriolet or Non-A/C 8v
Scirocco
The foxes are easier to work on because of the way the engine is
mounted.
Water pump pulley
Crankshaft pulley
Lower alt bracket
upper alt bracket
upper alt tension arm
The lower bracket is the hardest part to get to. Take the timing belt cover off (two 10mm nuts at the top, one 7mm hex screw on the side) Take the junk car's alternator out by taking the pivot bolt out (it's long). Take the timing belt off by loosening the tensioner (15mm IIRC). remove the front inner timing belt cover (one 10mm at the top and two 13mm) get the lower bracket by also getting the 13mm nut on the front of the block.
The other hard thing is the crankshaft pulley. It has four 7mm hex screws holding it on. It is easy to get in the wheel well of the junk car and get the bottom one out. Then turn the engine using a 17mm or your tire iron (same size). Get all four of those off, and you can just slip the pulley off. Try to get this from a Non-A/C A1 or A2, foxes sometimes have air conditioners on the backs of their engines.
The water pump pulley is easier to get if you take the whole water pump off. You'll need these bolts anyway to get your water pump on without the compressor bracket there.
If the junk car's v-belt is there - get it. You can measure it and get a new one at the parts store.
|
Useful Part Numbers: Pulley Part Numbers - Non-A/C - 126
121 031
With A/C 127 121 031 Alternator Bracket Part Numbers - Non-A/C
Bracket -
Lower 049 903 103 B;
|
| Bushings on the left, Early style non-a/c on the right. |
|
Neptuno Mod: Alternate Alternator Adjustment: Turnbuckle
Neptuno writes >> As some of you know I have a 1982 Scirocco. The set up for the alternator in this model with the stock 1.7ltr in is is less than desirable when adjusting the tension for your alternator. The reason for this is that the tension is created by pushing the alternator towards the engine, but the problem is that the alternator lives under the HUGE York AC compressor. This makes the task painful.Timbo writes >> Many other cars can
benefit from this project. I'm going to do this myself on a non A/C
Rocco soon!
Neptuno writes >>
This weekend I noticed a drop on Voltage so I decided to get clever
and this is what I did:
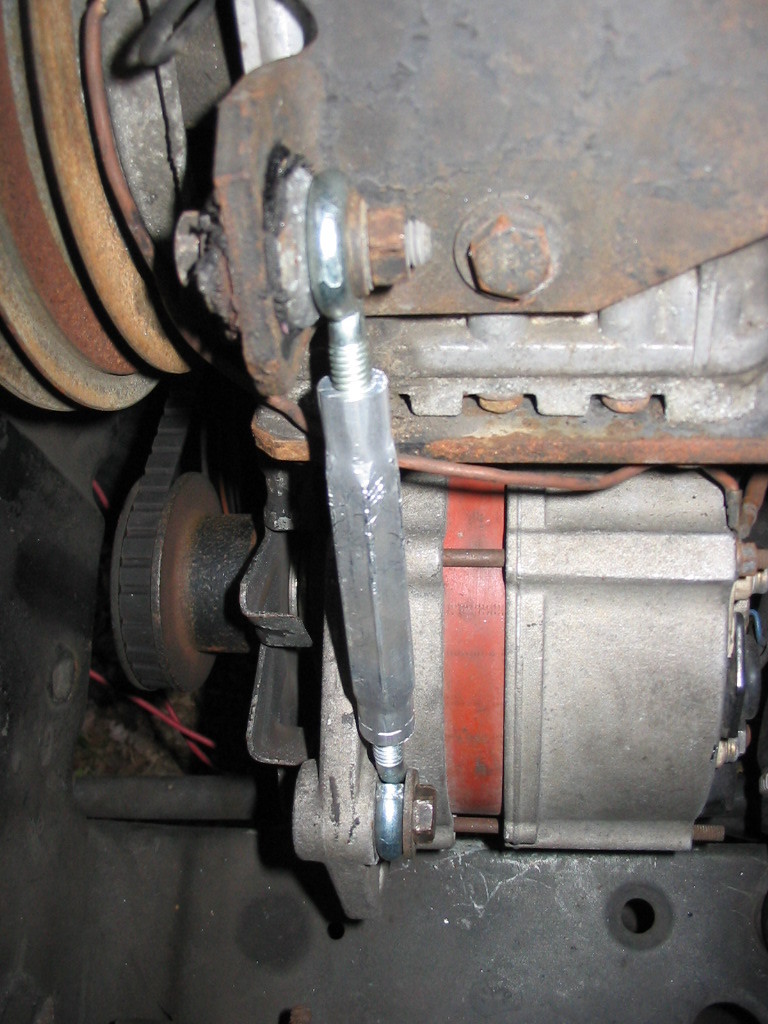
The Turnbuckle Project!
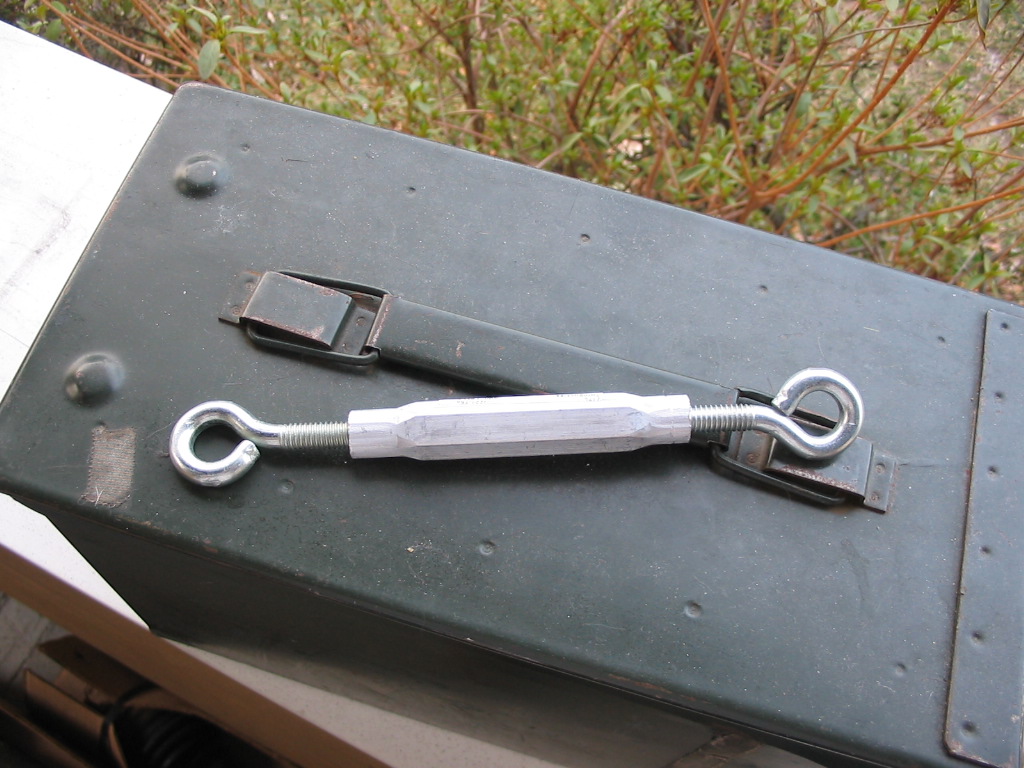

<1. I took my happy ass to Wal-Mart where I found a turnbuckle rated at 150#
<2. So that I could replace the Ugly non-grip plate that is the tensioner bracket on the car
>3. and >4. Next it was a matter of swapping pieces and placing some large enough washers to cover the hole on the eye lids of the turnbuckle
This can work on 8v and 16v cars. USRT has a similar setup to this...
Now just adjust away and find the tension you need by not having
to push or pull on the alternator itself, but bu turning the middle
housing of the turnbuckle left or right.
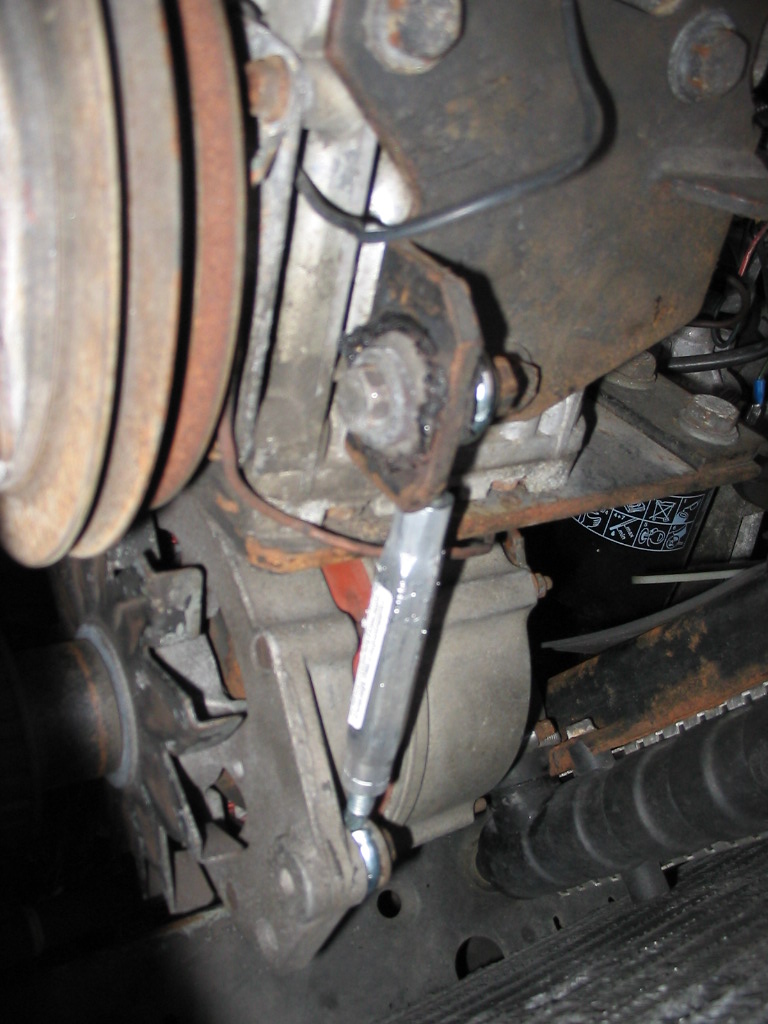
I believe that this Modification can be used on other set ups not
just this under the AC compressor type like mine
*NOTE*
Make sure that the threads on the turnbuckle screws are at the same
distance so you get equal distribution of tension.
I hope you love this simple mod as much as I do. It is cheap, easy
and quick.
El Tony
[Link to the original VWVortex Thread]
[Back to Top] [Index] [VWC Forums] [Contact/Donate]
Remember, If you need help with any of these technotes -Contact Me!
We are not responsible for damages caused while following the directions in these pages. These pages are for informational use only.
This site is in no way affiliated with or endorsed by Volkswagen of America or VW AG. Volkswagen and the VW logo are registered trademarks of Volkswagen
AG. To visit the official Volkswagen sites go to Volkswagen Germany
or VW of America.
All original images and content Copyright © 2001-2005 Eric Soltwedel, Tim McConnell and vintagewatercooleds.com, all rights reserved.
Not all of the pages comply with the new standards yet. I have the links here for debugging purposes.
![]()
![]()
![]()
About the Standards and Scripts