


Page last Modified:
Thursday, February 16, 2006 04:06:18 PM - Views

[H4 headlight connector] [Car Wiring colors]
| Download PDF version of this technote... | |
 |
This file is Adobe PDF format. If you
don't have Adobe reader... |
Huh?
Why relay your headlights? well - if you have aftermarket light housings, or are running higher wattage bulbs, then you are exceeding the capacity of the factory wiring in your car. Relaying the headlights makes the path the power has to take much much shorter. In stock form, the power goes from the car battery back to the fuse panel. Then it goes through a relay that turns them off when the key is turned. Then it goes through the fuses, then up to the headlight switch. It goes right through that switch (ever feel that switch get warm?) Then, it goes back into the wiring harness and back up to the front of the car to connect to the headlights. All of this wiring is just the right gauge for stock bulbs (VW does not want to spend even an extra penny per car - this is mass production). All of this wiring is 15-25+ years old.
Long path.
So - relaying does this... The power goes from the battery to the fuse, then a few inches to you're relay box. Then it goes to the headlight. MUCH shorter. The advantage here is that since you can use new wiring, you can make it a larger gauge than the stock wires are. And you can happily run 110W bulbs all day long and not fry wires.
Parts!
Alright, For this, you need to go down to the
auto parts store and find some really good crimpers. Don't
get the kind for insulated terminals, those are crap. Get
the kind with the notch that will make sure that you
connections are TIGHT.
Here's a list of parts you may need:
Wire: Get at least 14 Gauge - I used 10 (Overkill)
Project box - Radio shack. holds the relays
4 Relays, Bosch 30A - Get these from
www.partsexpress.com
4 Relay sockets - Also parts express
Terminals, plugs and H4 connector - all in the auto
parts store.
Inline Fuses - ATO is better because they are easy
to find.
Soldering iron, shrink wrap 3:1 with adhesive
(More content following this table)
|
You can buy some of the
parts online. Here's some that I've found... |
||||
|
|
Bosch 30A Automotive Relay |
|
30A Automotive Relay | |
 |
Relay Socket |
 |
2 place Relay socket (this is rare) |
|
 |
Bosch Relay socket - no wiring pigtails. This is very good for making your wires go directly from the relays to the headlight sockets with no splicing of wires. | |||
 |
H4 Headlight Socket I've found that advance has a good one with pigtails attached if you would rather splice wires then crimp. |
|||

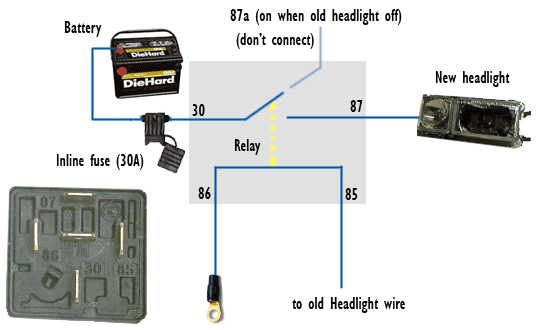
Instructions:
Alright, look at that
diagram. The way I have it set up, the stock
wiring stays the same. When I got my lights, they
came with these cheesy H4656 to H4 connectors (which
were wrong, BTW), I used one to plug into the low
connector on the driver side. I put the project box
there in front of the battery, it's close to the
power and there's nothing there anyway.
Fuses:
Don't ignore the fuse! It may not seem like a far
distance to go, but a short is REALLY bad. Ever seen
a car battery explode? It isn't pretty.
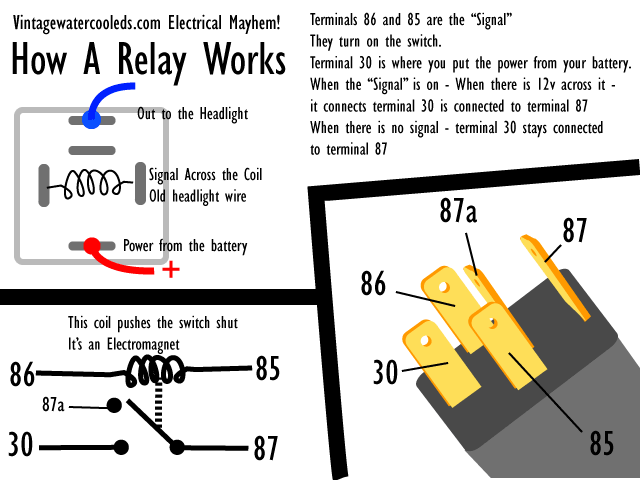
How a relay works:
there are 5 pins on the bottom of a relay. A relay
is a remote switch that turns something on when it
gets a voltage on the trigger pins (86 and 85). It
doesn't matter which is ground and which goes to the
old low beam. the other terminals are where the new
wiring comes in. Connect the battery (through a
fuse) to pin 30. When the relay is triggered, that
will go on through to pin 87, which you attach to
the H4 bulb. 87a is where the power would go when
the relay is not triggered, so don't connect that to
anything.
Wiring Diagram (In
semi-normal people format)
(More content following this diagram)
First Version here is the 4 relay - for Redundancy!
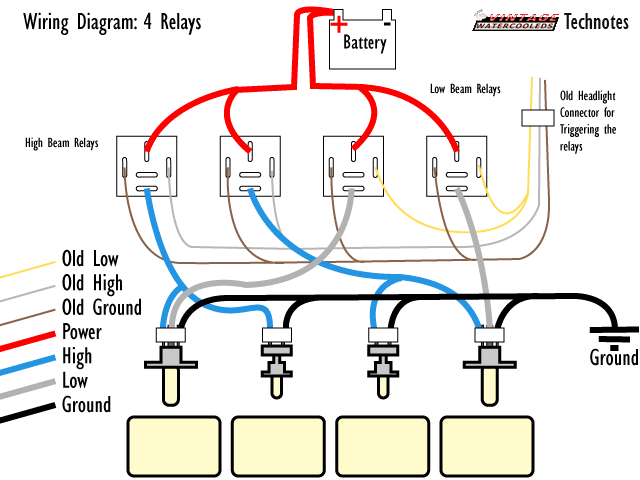
____________________________________________________________________________________
But - When it comes down to it - 2 relays work just
fine! I suggest using 40A relays!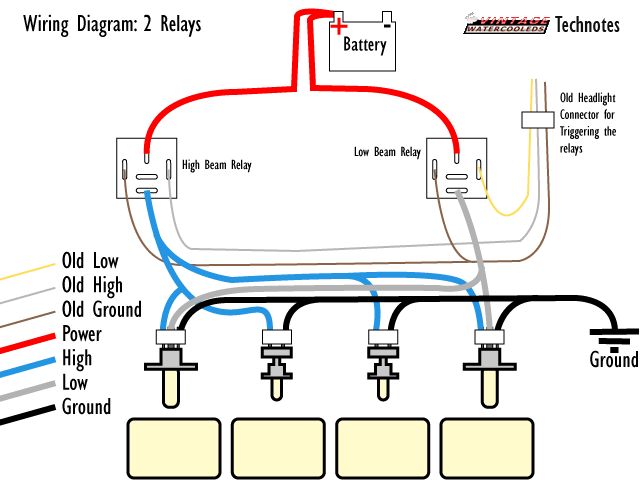
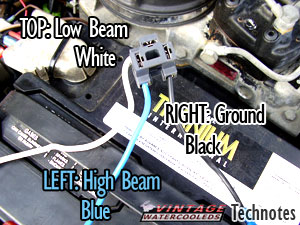
Headlight Connector Diagram
(More content
following this diagram)
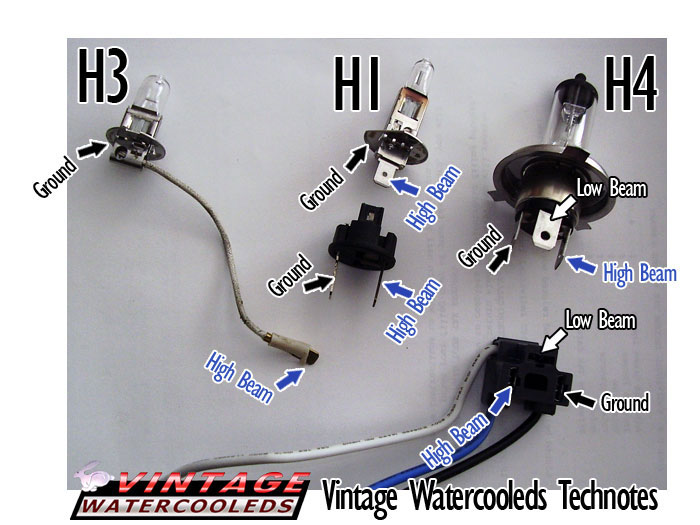
Bulb Diagrams
How the Relay works
You do this 4 times - one for each side of high beams, low beams
(More content following this
diagram)
Alternate Illustration!
Car Wiring Colors
Just think of it like this - Yellow is darker than white - yellow
low, white high.
| Wire Color | Description |
|
|
Low Beam, Left |
|
|
Low Beam, Right |
|
|
High Beam, Left |
|
|
High Beam, Right |
|
|
Ground (both sides) |
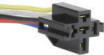
Some Nifty Pics of my relays!


|
If you do not want to build the harness yourself... |
|
 |
APC Headlight Upgrade Harness Kit, This looks like a pretty good kit, it will run you're outter beams, and it's easy to use. At the time I posted this, it was $49.99 |
[Back to Top] [Index] [VWC Forums] [Contact/Donate]
Remember, If you need help with any of these technotes -Contact Me!
We are not responsible for damages caused while following the directions in these pages. These pages are for informational use only.
This site is in no way affiliated with or endorsed by Volkswagen of America or VW AG. Volkswagen and the VW logo are registered trademarks of Volkswagen
AG. To visit the official Volkswagen sites go to Volkswagen Germany
or VW of America.
All original images and content Copyright © 2001-2005 Eric Soltwedel, Tim McConnell and vintagewatercooleds.com, all rights reserved.
Not all of the pages comply with the new standards yet. I have the links here for debugging purposes.
![]()
![]()
![]()
About the Standards and Scripts