


Page last Modified: May
16, 2005
- Views

Mk2 Scirocco Plate Mod
This one is pretty easy. Also it's cheap! I found that this plate holder from the Volkswagen Quantum Sedan fits between the tailights of the Mk2 Scirocco Perfectly. My white Scirocco went to cincy with one of these and was a hit. So - I did it to my new gray car too. Now that this is two of a kind - you can do it too - to make this a neat alternative mod. Makes the rear smoother - but you have to embrace that US plate! no euro plates for you!
Six holes is all you need to drill.

- Drill bits - You need a huge one for the bulb sockets
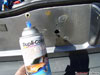
- Paint for stopping rust
- VW Quantum Sedan rear plate holder
- Ratchet with 8mm socket
- Wiring stuff
If you 719 guys see a quantum in the junkyard down there in Colorado Springs - yeah - I couldn't get that trunk open! (HEHEHEH!!!) Yeah - I punched the living crap out of that lock and finally got it to open!


Next, you have to see where to drill. Here's what I did - I took some blue RTV I had laying around. I spread it on the end of those studs. Then I put the thing up against the car - all nice and aligned. Then you just drill the goo marks! Make sure you wipe off your silicone or whatever before you let it dry!


Drill 'em - see if it fits. No big deal if you get some of them a bite off - just widen the hole with your drill.
Now - the next thing is to make the hole for the light bulbs. This hole needs to be pretty big so you can fit the bulb holder though when the bulb burns out. My 1/2" drill bit was not qute big enough - so I just widened the holes a bit.


If you want, you can also make holes in the plastic and put that under the plate holder - it does not matter - it'll look fine either way. I didn't do it this time (mainly because I forgot to!)


Next - get the wiring sorted. Just ground the ring terminal in the middle, then run the green wire over to your parking lights. This loop here in the left tailight harness is part of the parking lights. I just tapped into it. While you are here - get new bulbs for them!! I got some 194 Long life bulbs - so I don't have to deal with changing them for a while. I drive with my lights on all the time.


I have twins now!!
[Back to Top] [Index] [VWC Forums] [Contact/Donate]
Remember, If you need help with any of these technotes -Contact Me!
We are not responsible for damages caused while following the directions in these pages. These pages are for informational use only.
This site is in no way affiliated with or endorsed by Volkswagen of America or VW AG. Volkswagen and the VW logo are registered trademarks of Volkswagen
AG. To visit the official Volkswagen sites go to Volkswagen Germany
or VW of America.
All original images and content Copyright © 2001-2005 Eric Soltwedel, Tim McConnell and vintagewatercooleds.com, all rights reserved.
Not all of the pages comply with the new standards yet. I have the links here for debugging purposes.
![]()
![]()
![]()
About the Standards and Scripts